Volumetric textile teapot: master-class. Lyalka Meister-class Shitya MK Kettle for the tea fairy Tkanina
A nice teapot, sewn from textiles, to embellish the kitchen. Yogo can be beaten for picking up zucerok and tea bags. Qia article - report description order how to sew textile teapot(scheme that form, master-class). Adopt a kitchen that looks fun and inconspicuous, so you can embellish it with such self-contained flasks with a unique design.
Materials
For robots you need:
- Bavovnyanі matter: for the inner and outer sides of the virobu.
- Material for stuffing (the most suitable synthetic winterizer).
- Merezhivo white color.
- Corrugated cardboard.
- Bavovnyany white textiles.
- Felt two colors - white and horn.
- Linen fabric in brown color.
- Tovstі embroidery threads.
- Gossamer is gluey.
- Twine for decor.
- Hot glue.
How to sew a teapot from fabric? Step by step:
- Prepare paper pattern. Transfer to textiles with improved seam allowances.
- Check out the basic details from two different textiles.
- Sew at once 4 pieces of a book. Fold the front parts of the two sides. So fold the front parts in the middle and two internal parts. Viyshla construction, scho names guess miniature designations.
- Ruhayuchis right-handed to the left, sew on the edge of the parts. So just pull the sidewalls with the front parts in the middle.
Important! Don't forget to splurge, so that you can vibrate.
- Join all the wedges in one canvas, then join. Write it down by hand, and then write on the machines. Wyvern on the front part.
- Now prepare the bottom for the kettle. Vykoristovyte like a pattern for a round plate with a large diameter. Cut the collar for the inner part, sew to the base.
- Stuff the rollers with a padding polyester to fix the body of the viroba.
- Cut out the round part from the cardboard for the bottom, as well as 2 round parts: from the synthetic winterizer and the material that is victorious for the outer side.
- Sew the textile part by hand. Insert the inside of the cardboard and synthetic winterizer parts. Tighten.
- Sew the base and bottom part for the help of a blind seam.
- For the neckline, cut the fabric collar with a width of approximately 35 mm and three times larger, lower the diameter of the neck in the robe. Sew on the trim by hand, not forgetting about the folds on the turns.
- Insert a synthetic winterizer tab and sew in the middle.

Cooking lids
To prepare patterns for a textile teapot, find out the kitchen that fits in diameter. Check the details of the round shape from different materials:
- Corrugated cardboard - 2 pcs.
- Sintepon - 1 pc.
- "Internal" textiles-1 pc.
- "Sunny" - 1 pc.
Important! Get a bigger opening for seams.
Work order:
- Sew that tie for the same principle, like a bottom.
- Stuff the top half of the lid with padding polyester.
- Knit 2 halves and carefully sew with a hidden seam.
- Cut out the details for the spout and handles, pin the incisions. Fold, fill the spout and handle with synthetic winterizer. Cut the handle for the handle onto the lid. Tighten the colo, fill it with padding polyester.
- Sew the handle to the lid.
- Gently, with a hidden seam, sew the spout and handle to the finished fur.
How to decorate a teapot with your own hands?
Cut the label out of felt, embellish it with lace and applique with linen. Glue all the elements of the application with hot glue. Sew or glue the label to the finished fur. Tsikave ta original embellishment ready for the kitchen. Let's hope, that the master class, how to sew a teapot from fabric with your own hands, being worthy of you.
Cup with saucer
Otzhe, m'yakonabivny teapot є, but the cups are not. Disorder. You can make a soft textile cup following the same principle as to sew a teapot. Cut wedges for the front and inside sides, stuff with padding polyester, and stitch the pleats with a "machine" seam manually. Now it’s too much to sharpen the bottom and sew on a handle, follow the already known technology.
The saucer can be round, rectangular or foldable. In the yoga base - 2 parts from fabric, with a pro-shark from a rolled synthetic winterizer or a non-woven fabric.
Heating pad for teapot
This is not just a handkerchief for the kitchen, but it is even more corisna. Now the tea will not be reached until now. Prepare її with your hands just as easy. Navitt pochatkіvtsya kravchinya, with the singing diligence, you succeed in working with them successfully.
Otzhe, you need to know:
- Textile.
- A piece of fleece.
- Knives.
- A line and an olive for rozmіtka.
- Braid for decor.
- Pins.
We prepare the heating pad in such a manner that it is freely pulled over the kettle. The width of the finished virobu - tse vіdstan vіd the spout of the teapot to the edge of the handle.
Important! Take trohi from the reserve, so that you can safely pull in and remove the heating pad.
The skin side of the virobu - 2 textile details with a non-woven prosharka:
- Chop off the parts with hairpins, stitch them along oblique lines. Apply lines along the lines. The back is mutually parallel to the lines, and then perpendicular to them. Threads for stitches to choose the tone of the fabric.
- So itself to issue and another part of the canvas.
- Fold the offending halves, stitch them on the sides.
- Cut out two parts for the inner liner, sew.
- Now fold the inner part of the face. Zignuvshi material in the middle, stitch and decorate the bottom.
Important! Fill in the center of the unsewn plot about a centimeter. Insert a loop at the new one, tie it with tapes, sew the opening by hand.


So how to sew such a wonderful teapot?
For whom do we need:
- fabric (mostly bavovna, calico, calico)
- synthetic winterizer
- merezhiva, gudziki for embellishment (for bajannyam)
- Knives, threads, thin needles.
Vikroyka:

The cut of the long piece comes out 13 cm with allowances, the diameter of the upper stake is 14 cm, so increase the shape to these parameters.
Let's start with the biggest thing in a teapot - from the belly). According to our form, there are 8 clasps with allowances for the outer side and 8 for the inner side.

We take 2 claptices for the outer part and 2 for the inner part:

All 4 details are sewn in this order. come out like a star. On the folds / rounded edges, there are robimo stitches so that the fabric does not wrinkle after the twist. When sewing on, one wonders that on the outer side (as seen by the teapot) there was the outer side of the fabric.


Like before, 4 balls were sewn at once, robimo nadrіzi:

Continue to sew more carefully right-handed:

Internal claptices and ovnishnі zshivaemo:

From the front side it is turned over to the inside, as shown in the photo - in such a way that the mustache appeared in the middle, like a cocoon. We are stitching - we’ll put our husband at the possible belly of the teapot. Don't forget to work hard:

Through the bottom of the "cocoon" a teapot is vibrating, weaving:

Robimo the bottom of the teapot in 2 copies - for the inner and outer sides. You have a vikroyka, but, in my opinion, it’s better to put a kettle on, what a viishov.

In this order, the inner bottom is sewn on the back:

Nibuyemo otrimani chastochki synthetic winterizer. Axis to enter:

Robimo callous bottom, embroidered with callous cloth into cardboard, stitched, then otrimane the bottom is sewn to the teapot with a hidden seam:

Potimo robimo two lines for the top of the teapot. 3.3 cm of fabric in width, with a length around the perimeter of the stake of our top and a 2.5 cm stitch for stuffing. Tse mozhe buti sintepon or shchіlna fabric.

We put stuffing in the middle of the stitch-fabric and sew it to the top:

In addition to the spout and handle of the teapot, you have a shape:

Stitching, robimo nadrizi:

Stuffed with synthetic winterizer:

With the help of a hidden seam, we sew a heavily stuffed spout and a handle to the "skull" of the teapot. Change, stench is diametrically opposite.

Axis to enter:

Let's break the cover. On the top, add a vikriyka (kolo), fabric on the lid is better than robiti with good allowances:

We sew the lid, stuffed with fabric and cardboard with padding polyester. Robimo another kolo - for the bottom of the lid, so the very "clothes" the kolo from the cardboard into the fabric and stitched, lifting:

Sewn on with a hidden seam.

Robimo the handle of the krishka, you can lift it for yak її. Robimo circle with fabrics, stitched on the stake, tightened

We lift our handle, stitch it, as shown in the photo. Sew the handle to the center of the cap:

Well, that's all! Tadadadam! The teapot is ready A viishov teapot with a height of 9 cm, without breaking the lid, with a diameter of 10 cm.

It was left to hide the middle of the zukerko-smachne and put it on a chilly plate.
Material taken from the Internet!
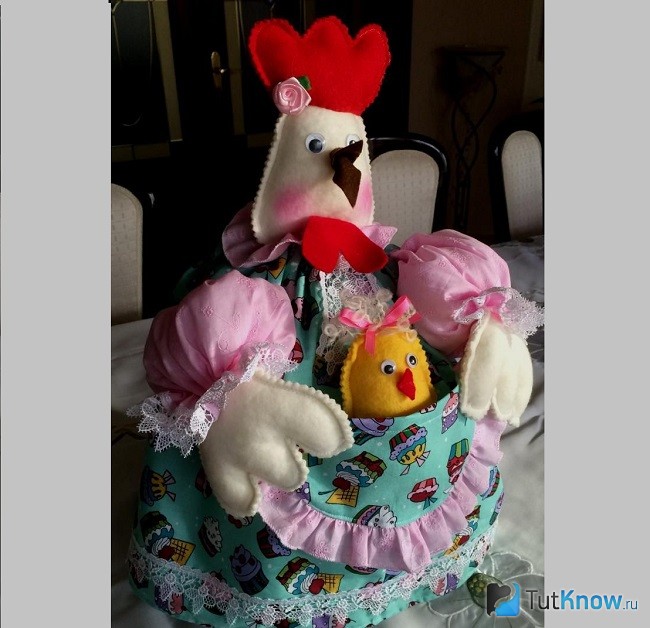
Wonderful idea for a gift to relatives and friends - wonderfully beautiful hugging teapots. Quiet and handy interior item, which is sure to never be broken, 3D-ware, fragmentation in patchwork style.
1. We take two blanks for the outer part and two for the inner part. We store two blanks for the outer part one to one (stack A). These are the same for the blanks for the inner part (stack B).

2. We put stack A on stack B. If you “over-gorge” the workpieces, then you will be amazed at the appearance of the workpieces.

3. We sew our stack of 4 blanks with a seam width of 0.5-0.6 cm in view of the cut.

4. Turn out like in the photo.

5. Let's put one more workpiece on one half of the top.

6. Turn over and put one blank for the inner part on the half of the inner part. We again have a “pile” of 4 blanks, which is a waste of time. So we continue until the end.


7. You are guilty of turning out of 8 chasms. Now all the parts are needed: the inner part of the ear of the turn (1 chasm) is folded all the way to the top with the inner part of the turn of the turn (the rest of the chasm), with them we add one of the outer parts of the turn. The other part of the outer part of the city is swept away, so that it lay down all night with the other part of the outer part of the turn. The whole turn will be between the inner parts, like a cocoon (for the outer MK, the sequence of folding is reversed, so the turn will be between the inner parts).


8. Usі chotiri parts nadіyno skolyuєmo and stochuєmo.

9. Carefully pull the teapot blank through the bottom.

10. The result is like this.


Reshta process is easy.

This lovely teapot can be vicorated like a pillow for the heads.

YOU WILL NEED
teapot cloth
tea bag fabric
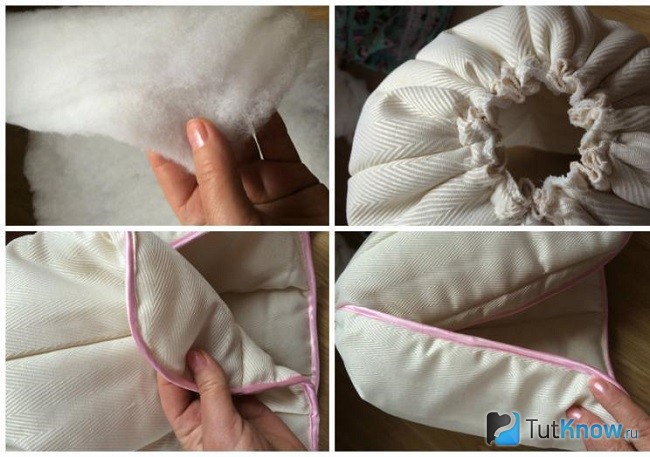
stuffing material
Cotton batting
Plastic bag with a diameter of 12 mm
Thread for bag
Rice or plastic granules
YAK ZROBITI
Add a female husband of fabric with a size of 32x16 cm plus allowances. Fold the workpiece across with the front side in the middle and lay a seam on the bridle of the cut short edge. Turn the workpiece to the front side and request allowances.
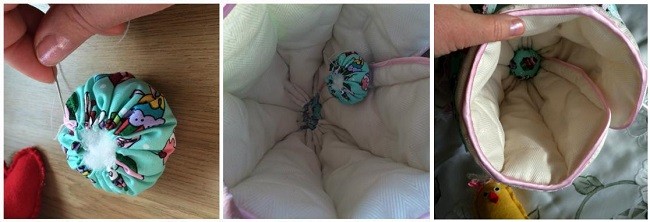
Insert a thread of floss into the neck and lay a kostorisny seam over one of the closed edges, without sewing the balls of fabric. Tighten and fasten the thread. Cut out a small circle of fabric and sew in the middle of the part to close the opening (div. small. A). Lay a koshtorisny seam along the upper edge of the part. Fill the part of the teapot with rice or plastic granules approximately on a third, fill the grate well. Tighten and fasten the thread.


Fold the fabric for the handle and put the spout on the front side in the middle and translate the templates. Sew and fold the blanks, filling the allowances. Do not forget to work on the allowances.


To turn all the details for an additional wooden stick (div. small. B).
Iron the nose and handle and ask for allowances. Stuff all the details for the help of a wooden stick. Pin the details to the teapot with pins, switch to the one where the stinks are stitched correctly and sew them on.


Fold the fabric for the lid with the front side in the middle and put it on cotton batting. Override the template, sew all the materials and cut the blank. In one of the balls of the fabric, cut an opening for the wiver, turn the part on the front side and ask. Lay a decorative seam that has stepped into the edge of the lid 5 mm. Stuff the lid through the opening for the vivertanna and carefully sew up the yogo.
Put a lid on a flask with a troch less radius than yogo. This technique allows the workpiece to be swollen on one side and flat on the other (div. Fig. C).
Cut out a small circle of cloth and put the middle plastic bag, frontally smeared with glue. Glue the fabric up to the bag behind an additional wooden stick (div. small. D). Sew the bag up to the lid of the teapot.
Fold the fabric for the tea bag with the right side in the middle, translate the template, sew the blank and fold it, leaving the allowances. Turn the tea bag on the front side and ask yoga. Tie a knot on the end of the thread for a bag. Attach the thread to the bag for the help of the stapler, or hurry up with your bare head.
Sew or glue the lid to the teapot so that the tea bag hangs on the name


The teapot can be embellished with a fabric slip or other images, attached to an additional interlining.


Refine your kitchen with calmness and uniqueness with such objects as a soft vase, cups, a teapot made of cloth. Find out how to sew a ball from this material.
Beautiful m'yaka vase with your own hands

To sew such a thing, take:
- kіlka vіdrіzіv rіznoї bavovnyanої fabric;
- skein or cord;
- head and thread;
- hairpins;
- bowl
- scissors.

If the canvas is wound, take another winder. Start yoga cob at the end of the first, also wind it on a string.

Continue wrapping the warp, wrap around the turns. For it to be more convenient, put the robot on an inverted bowl or another dish of a suitable shape. Chop the turns with studs.

Having fixed a row in such a rank, grind yoga from the front. Take the hairpins, creak yoga with the coming.

Having finished the work to the end, you will need to cut the lace, turn the underside of the fabric, sew to the front turn. You have a beautiful soft vase, and even more original. If you want to grow one more, marvel at how you grow.

Such a vase for being-yakah dribnitsa squirm with scraps of fabric and old denim speeches. For її creation take:
- denim;
- Bavovnyan canvas;
- flizelin;
- cardboard;
- sewing accessories;
- winder from the castle.

On vivoritny bek a square of jeans is put cardboard, on a new one - non-woven fabric. In the photo, with white dots, the place of the folded edge of the jeans is depicted. Before Tim, as if you were growing, shave on him little folds.

Zignіt bіchnі blanks navpіl, pіdvernіt sides from one that іnshoy side, request. Stitch them to the right side of the square.

Stroke the sides to the edge, entering 1-1.5 cm. Lifting yoga, you can sort out and choose a soft vase of fabrics.

Sew on the lower side of the bottom a rectangle made of fabric, and a new original item for the interior is ready.
Sewing fabric teapots
Stink to embellish be-yaky budinok. Such utensils can be given, sold, brought to children, so that the stench was played with a safe object, the power of tea.

Enlarge the form on the screen, apply an arch to it in A 4 format, repaint it.

How to sew such a teapot, the form is suggested. Like you bachite, it's made up of five patterns. Two stakes - the whole bottom (larger with wrinkled edges) and the lid of the teapot. You can work the edges not like this, but equal. For the sidewalls, it is necessary to make 8 wedges for the outer side and insoles for the inner side. Nagori right-handed in the photo, the handle of the teapot is bent, at the bottom of the third side of the yogo spout. From fabrics it will be necessary to choose two such blanks.
The axis that was needed for the creation of this model:
- monophonic fabric and string, vіdpovіdna for color;
- fluffy interlining;
- threads that head;
- Bavovnyan is unhappy;
- sewing machine.
At this point, blanks for the facade part are made up of two parts. At the seam between them, they put a tasma, in such a rite they sewed off the canvas, then they cut the yogo.

Applying wedges one to one, grind them on a sewing machine in a single canvas.

So just insert the wedges for the inner part of the kettle.

Having attached the bottom template to the stringed fabric, cut a circle from it. Fold with the front sides the inside and outside of the sidewall of the teapot. Raise the lower part with a round bottom, stitch along the edge.

Wrap the sidewalls on the face, put interlining between them. In order to increase the frequency, sew between them on your hands.

Sew the teapot with the hands of the master, tobto with your own, like a cicavo. Let's get down to yoga recovery. For this fabric, two stitches, skin width 5 cm.
Cut out two round blanks for the bottom and the lid. Also, two cardboard mugs are needed, trochs smaller, lower fabric, so that the edges can be burnt.

Lay on the fabric near the bottom of the troch flizelin, on the new one - cardboard. Sharpen the bottom on your hands to the lower part of the sidewall. Turn the teapot over, sew a stitch to the upper part of the guise. Putting a synthetic winterizer here, light up this line in the middle, sewing it to the other edge on your hands.

Turn the spout and handle of the teapot, stitch the details on the sides. At the opening, having settled down, put a synthetic winterizer.

Sew a spout on your hands from one side to the teapot, like a handle from the other side.

For the lid, it is also necessary to cut a circle from the cardboard of a small size troch, lower fabric blanks. Put on the vivoritny b_k of the cover from the fabric of the synthetic winterizer, then the cardboard. Sew the facade from the back part of the lid, laying a line along the edge, as if stuffed with padding polyester.

Following the same principle, prepare a small handle for the cap, sew on the center.

The axis of such miraculously sewn teapots comes out of the back of a hoarse needlework.

If you want to make a service, then wonder how to sew such a miraculous cup and saucer.

It is created on the basis of the same principle, like a teapot: cut wedges from fabrics for facade salutary side Prom_zhok between them is filled with synthetic winterizer, intermittently stitched on the hands. To get rid of sharpening the bottom is small, give the beast a cup and sew a rounded handle to it.
The saucer can be buti with garnimy sagging edges. It is made up of two cloths of fabric, which are the same in size, between them it is necessary to lay a thin rolled synthetic winterizer or fleece. You can get cozy with a kitchen made of cardboard. You will find wedges for a cup, a template for a saucer in the offensive form.

Do-it-yourself heating pad for the kettle
Continuing the topic, let's wonder how to sew її. A hot-water bottle will help you to brew tea well, not to let me get cold, I will drink a trival hour. Let's do it with a simple butt, to get better, you can make a crown with even a little dosvid.

The axis of such a cicava river will appear unexpectedly in your kitchen. Take:
- fabric;
- flizelin;
- scissors;
- olive;
- line;
- a little tasma;
- hairpins.
The skin side is folded from two cloths of fabric, between them there will be interlining of three smaller sizes. Skolіt vlіzelіn with fabric studs, just qi 2 balls. For whom to baptize with an olive along the line of the oblique line. Some of them are cut in parallel, others are perpendicular.

Choose threads to match the facade fabric, sew stitches on olive rosettes.

Also, decorate and another part of the facade stony cloth, fold them on the first front sides, sew on the sides.
From the outer fabric, cut two blanks for the inner part, sew them together from the sides, twist.

Insert the inner part of the facade so that the seams of the details are studded in the middle. Sew along the bottom, folding the edges of the fabric in the middle.
Stitching along the edges of the blanks for the facade and the inner part, we will not sew up the tops in the center by 1 cm. Insert a loop with a string here, sew the opening on your hands.
Having mastered this clumsy butt, you can sew a chicken on the teapot in a form that suits you.

The leather ball is also made up of three balls - two fabric ones, between them there is a fleece. Comb and dzhob vikryte from red fabric. Give these details an obligation, fill them with interlining, sew on a plate.
Kril can not be sewn, but lined with a webbing tape, so that it can be recognized.

Having rested from zim zavdannyam, go to folding. Marvel, like a miracle chicken with curly hair you have a viide.
Axis of what you need:
- fabric for cloth rosemary 35x100 cm;
- linen for sleeping (stobany synthetic winterizer or insulation);
- 1 m of bias tape;
- 1.5 m mesh;
- napovnyuvach (synthetic winterizer, synthetic winterizer, holofiber);
- for eyes shmatochki felt (white and black color) or plastic;
- felt chi fleece;
- shades, blush or pastel olives;
- papier for vikriyka;
- silicone gun and glue for textiles;
- threads, head;
- kravetska kreyda;
- knives are zvichaynі and zigzag-like;
- centimeter line.
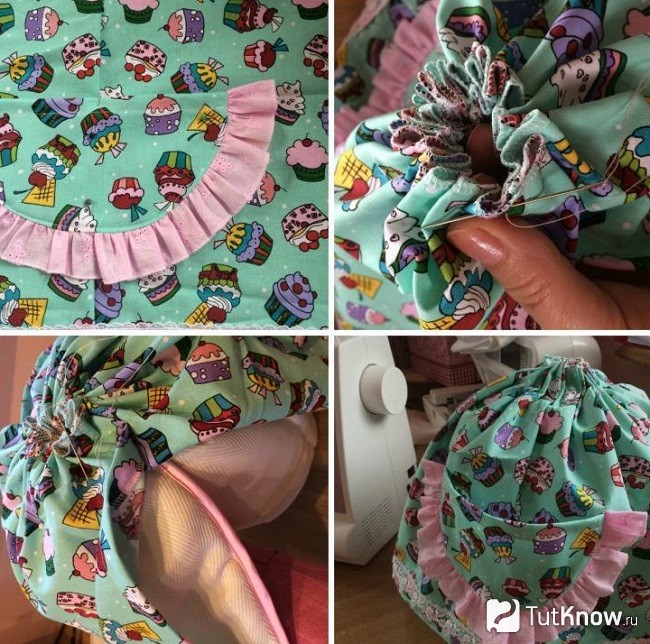
The bichni edges and below are decorated with an oblique inlay, in the photo there is an erysipelas color. The upper side, yak is not framed by an oblique trim, is taken on a thread. At the same time, the protilege edges will overlap.
The upper back is cut from the canvas with a size of 35x100 cm. Finish the edges with an overlock, slide the bottom of the back, sew on it. Close the edges, stitch.

Z tsієї f fabrics shirzhte napіvkrugly kishene with a size of 16 by 10 cm, work її z usіh sides overlock. P_dіmknіt smuzhku merzheva dozhina 40 cm, sharpen її to the round part of the gut.
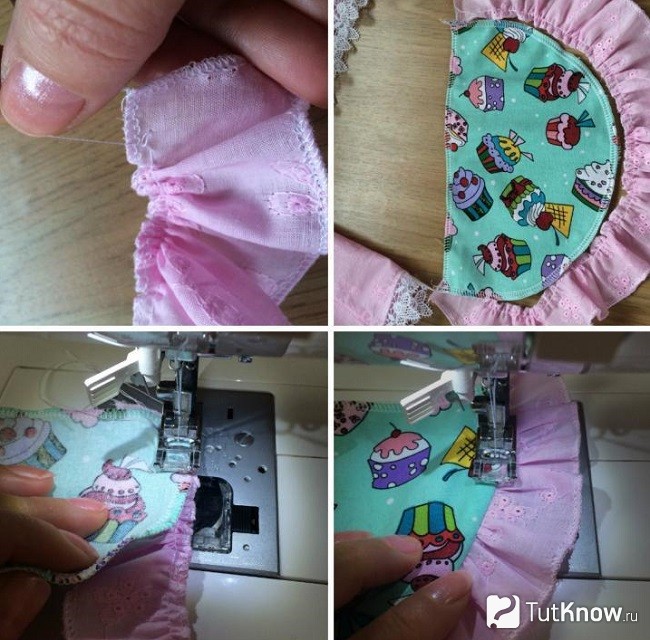
Apply the fluff to the front panel of the back, pin it with hairpins, then sew it on here. Pick up the top of the back on the thread, fix it. Lay the top of the back with the yoga bottom, sew on the belt on the hands.
Axis yak fared to fight such a heating pad for a teapot, with your own hands you need to open the sleeves for the cloth of the chicken. For this, take two rectangles of fabric with a size of 15 x 35 cm. Finish them with an overlock, fold 2 short sides one by one, sew. Trochs are more tangled to pick up the bottom of the sleeves on a bare thread. Stuff the sleeves with padding polyester, sew them on the plate.
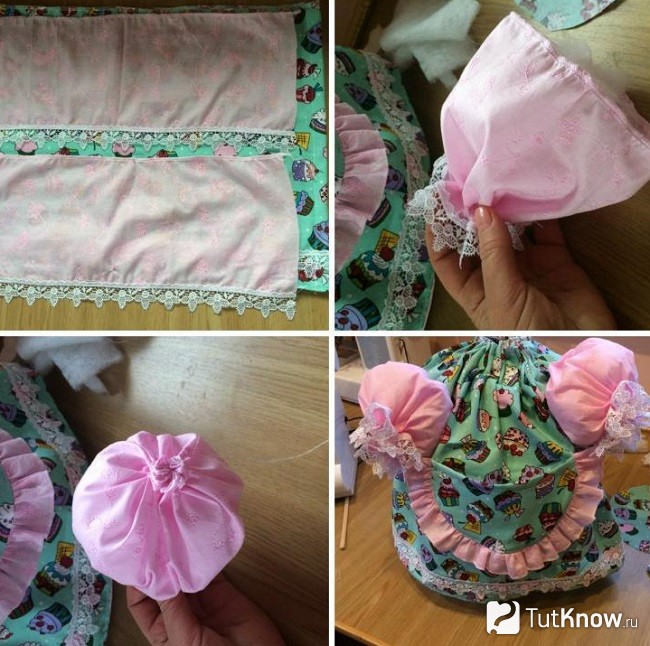
From the main fabric, cut a square with sides of 15 cm. Sew along the edge with a stitched seam, tighten the thread, but not to the end, but so, to fill the part with a sintepon. Її you sew in the middle of the back.
It didn’t get enough, so that the heating pad for the kettle was ready, the chickens were chopped with their own hands, and the curls helped to complete the work.
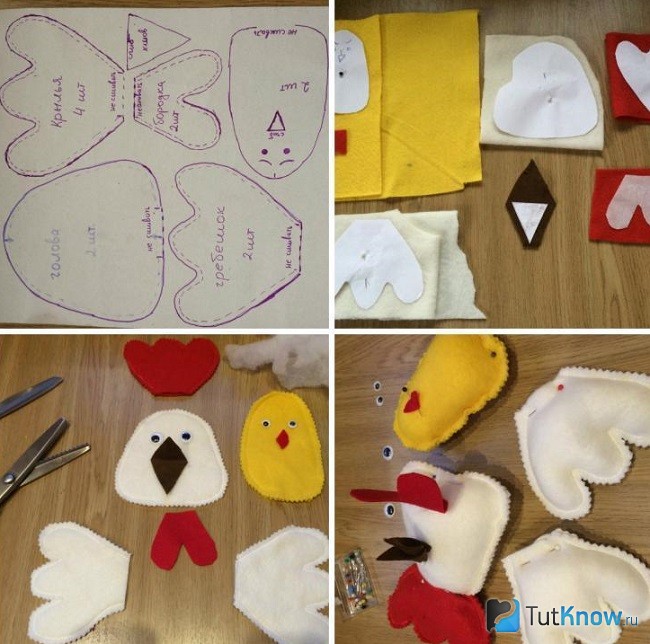
Know them.
There, on the form it says “do not sew up”, it is not necessary to grind off the details. To give respect, some pieces of blanks are needed for skin naming.
Kurcha vyrіzhte z felt or fleece of yellow color, the head of a hen from white, comb, beard and dzhob virіzhte z red material. Grind off the guys harvested the krill on the creel, work the edges with a zigzag, wyvern it on the face. Put a cloth at the sleeve, sew it on.
Glue the eyes on your plate, sew on the chicken and the curl. Sew guys the details of the rowing, beards, stuff them with padding polyester, sew them on your hands to the heads of the characters.
Lost to add chicken beauty, having walked on the cheeks with rouge. You can put tea bags and coffee bags instead of curdling in the intestines.
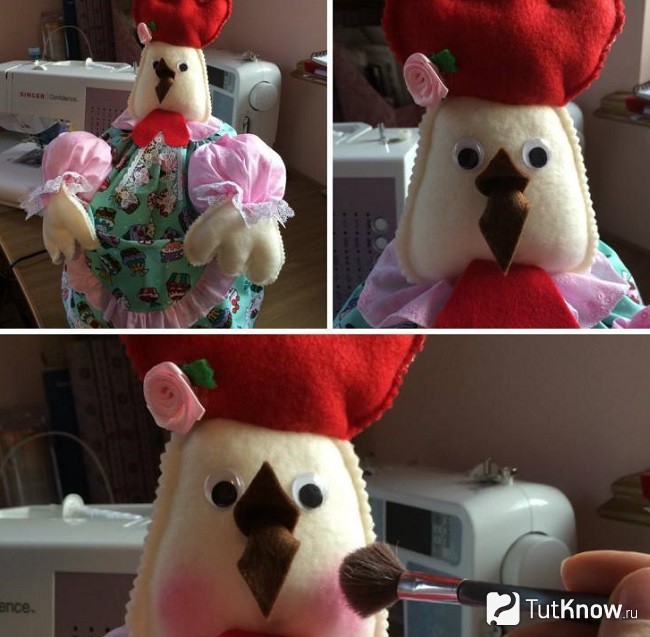
The axis is so miraculous, you have a heating pad on the teapot at the looking chicken. Let's marvel at how one more cicada item made of fabric is made to please little children.
Soft ball made of fabric for detlakhiv

Such appointments for small children up to 2 years old. The stench can chop the ball for yoga ribs, kittens, pick up. For needlework take:
- kіlka shmatochkіv fabrics of different colors;
- m'yaky on the top;
- head;
- saucer;
- threads.

Sew the number of stakes in pairs, filling from two sides on one small intestine for stuffing them with synthetic winterizer.

You need to create 5-6 such blanks. So that on the seam there were no unneeded folds, yoga in dekilkoh places with scissors. Fold qi blanks in a pile, so that the intestines for stuffing on the top of the bells show up, stitch them with the center.

Step by step stuff the skin with a padding polyester, sew up the opening.

One ball ready. If you want to marvel, like a friend, get to know the process of work.

Schob robiti such, take: clapti fabrics; on top; threads; head; scissors.
For one ball, you need to cut 8 oval blanks and two round ones, the edges of which should be bent in the middle by 6 mm and ask.

In the photographs, three balls are created at once. Grind along all the blanks from the sides.
To make it easier to sew, chop off the details of the sidewalls of the ball in pairs, stitch them from one side. Let's put together guys elements, sew those.

As a result, it is your responsibility to create the axis of such a bag, as it is necessary to fill it with a padding polyester through the opening, so that we cannot sew it up. If it is broken, sew yoga on your hands.

To keep the ball neat, sew on both sides along the round details of the fabric, after which one more masterpiece of needlework is ready. Marvel at how you make a teapot made of cloth.
Another video story is selected for you click for ideas. Having become familiar with them, richly anyone who wants to do the same in'yazana grill on a teapot or from fabric.