Unusual ideas for saving stationery. Do-it-yourself stand for olives

Olivets is one of the brown attributes on the work table, which helps us to keep the work space in order and know the writing skills. The quarterblog has prepared for you a piece of simple ideas, how to make olives with your own hands from the fact that you sound into a booth. In addition, tsі virobi can be mastered at once with a child. Let the original olives become an additional decorative element in your interior!
3 jar
The most popular way of preparing olives. Jars can be as good as: glass, plastic, plaques. You can glue them with different-colored paper, fabric, tasma, stitch, lace, paint with acrylic farbs - everything is laid down according to your imagination!


From cardboard and paper
Another simple way to make an olive is cardboard or colored paper. You can use cardboard rolls like toilet paper, packaging, old magazines or newspapers.


3 plastic bottles
Vykoristovyte plastic bottles for shampoo, cream and other cosmetics. For example, you can see comedy monsters from different colored spots.


From natural materials
More precisely, from the deck that little chick. Here you need someone to help you, to make the needed stump and drill holes in the new one for the olives. You can also take a sprat of the same height and tie them with a skein around the base.


3 clay
Clay is a fertile material for the creation of olives. Can you take it self-assertionpolymer clay and stick it around as a base, or choose the original design and fill it with sculptural clay or plasticine, and then decorate it with farbs.


Z olivtsiv
3 papa mache
The papa-mâché technique allows you to create ob'emnі figures from zdrіbnenny paper, mixed with glue: vikoristovyte newspaper papyr, and then rose the olive with farbs.

Zvyazati gachkom chi spokes
If you can knit, drag a child to get to knitting, then you can easily tie a warm, varied-coloured choker onto a base jar.


Sewing with fleece or fabrics
Soft and calm olives look the same from fleece and fabrics. To wear eyes, a nose and an ear to such supports - look like a funny little olive animal for a child's kennel.


Decorate with a skein, threads


Decorate with usistins, gudziks
If you need a little and a little bit of a robot, you can glue the olives with a little namistins, fireplaces, and udziks.
How to build a stand for stationery with your own hands. Pokrokov instruction with photo
Author: Yunusova Alsu Rifkhativna, tutor, MBDOU "Children's garden" 177 ", Kazan, Republic of Tatarstan.
Description: Master-class for teachers, fathers and all those who are not too handy to hand-practice. The maximum use of indirect material is one of the most important elements of saving our planet from an environmental catastrophe. Axis mіy is a small deposit at qiu corisnu on the right.
Anton Pavlovich Chekhov said: "Like a skin man on a piece of land, having sown everything that we could, what a beautiful boulder our land would be!"
Tsіlі: Do-it-yourself creation of beautiful and functional stands for stationery Goods for a gift for loved ones.
Task: Tighten the respect of the audience to the recognition of non-binding material. Raise interest to the preparation of gifts and speeches with your own hands.
For the preparation of supplies needed:
boxes of various rosemary, the lid of an inflated box of consumer rosemary, papier with a various print (I made 3 types of background for creativity of erysipelas, I made them on a color printer), glue, line, olive, knives, stationery nizh.


Head of preparation
The lid of the swollen box is the basis of the stand. On top of it, the boxes were cut in the following order: on the back - an opening for papers; in the middle - a round base for olives and handles, a wedge for attaching a medium size; in front - a low basis for whatever dribnitsa.

Farther away, the white box saw the upper parts, filling them with the necessary height.


Back vents - 15 centimeters of frill, olive - 11 centimeters, 2 boxes - 8 centimeters, lower - 4 centimeters.

The skin box was pasted over with a paper of selected prints, in such a way that the inner wall was covered with a little one. For this paper it is necessary to take the hanging height of the box.


In such a rite, she glued all the boxes to that olive, having eaten three little ones among herself.
When all the boxes were ready, I pasted them on the base, which I pasted over with the prepared paper.

The stand for stationery is ready. I stuck it on the robot, there is my helper)) Violins, glue, pencils, olives and pens, a stapler, papers for writing thinly are felt on it.
Not far off is the 1st of spring, the hour, if all the children break before school, and the students go to technical schools and the greater primary mortgages, the hour has come to take away knowledge. Most of your time is spent studying at the head office, and not less than an hour is spent at home preparing and attending household chores.
 In order to remove the material from the initial deposit, it is better fixed, it is necessary more comfortable and more beautiful for the working place of the booth. Insanely, an important writing style, a handy style, and also importantly, so that everything was necessary under the hand. It is the duty of the stationery set to cope with this task - the saving of pens, olives, gumoks, violins and other important dribnits.
 At this article The new portal "site" has specially prepared for you a selection of the most original coasters for pens and olives, so that you can work independently from hand materials without any special effort. With a self-made stand for olives and pens, you can make yourself proud, and you can give gifts to your girlfriends or friends, brothers or sisters.
Do-it-yourself stand for olives and handles

Required materials:

- threads;
- scissors;
- plastic jar;
- wooden sticks in the form of freezing eskimo;
- penzlik and glue.
Preparation:
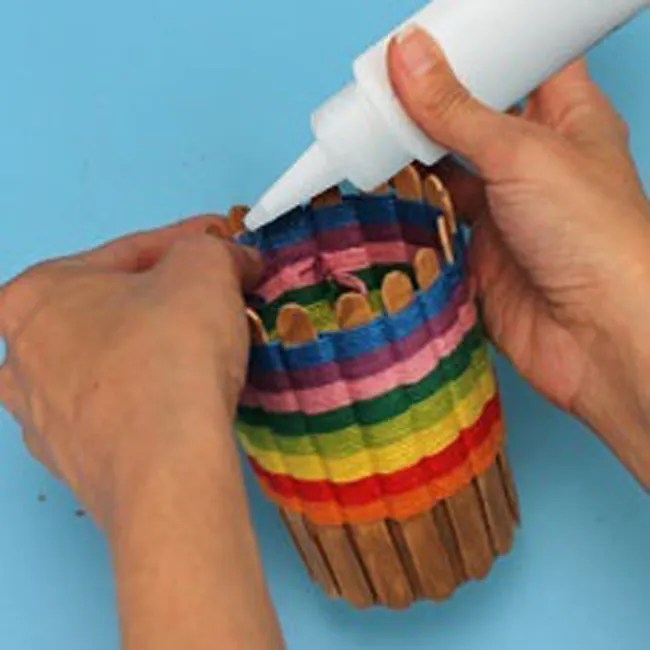
The top of the plastic jar is shaved, so that the dense and another centimeter of sprat were left on the top. For additional glue, wooden sticks are glued to a plastic jar (divine photo).
 Now wooden sticks are intertwined with different-colored threads, filling them with empty threads.
 Vikoristovyte threads of different colors, even if the olive tree is especially bright and invisible.
 You can embellish the finished olive with rhinestones, cyan stripes or cuddles.
Do-it-yourself stand for olives with plaques
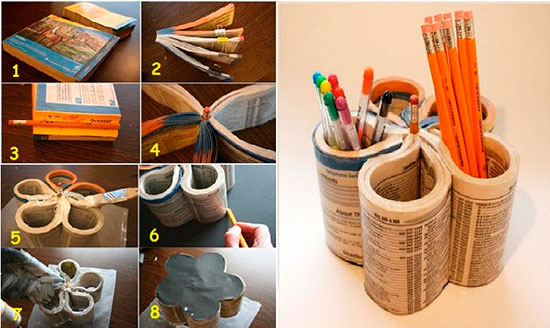
Do-it-yourself stand for olives and a pen from newspaper tubes

Required materials:
- newspapers and magazines;
- cardboard roller similar to toilet paper;
- glue;
- cardboard;
- double-sided tape;
- threads;
- acrylic farby.
Preparation:
To wind up tubes from newspapers or magazines, to cover them with glue, so that they were not opened.
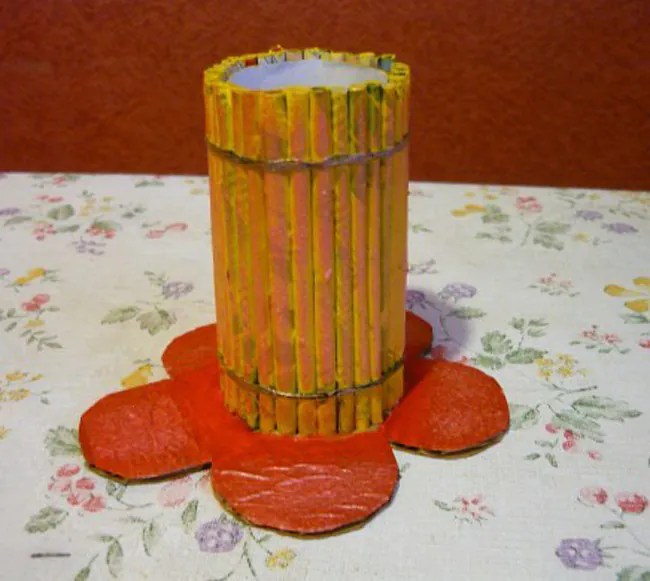
 Stick the tubes vertically on a cardboard roller with additional glue. For greater supremacy, tie them for additional threads.
 The bottom for the olive should be built with a figured sheet of thin cardboard (it can also be a card, leaflet) and glue the bottom on double-sided tape.
 Now you can decorate the olive and the day.
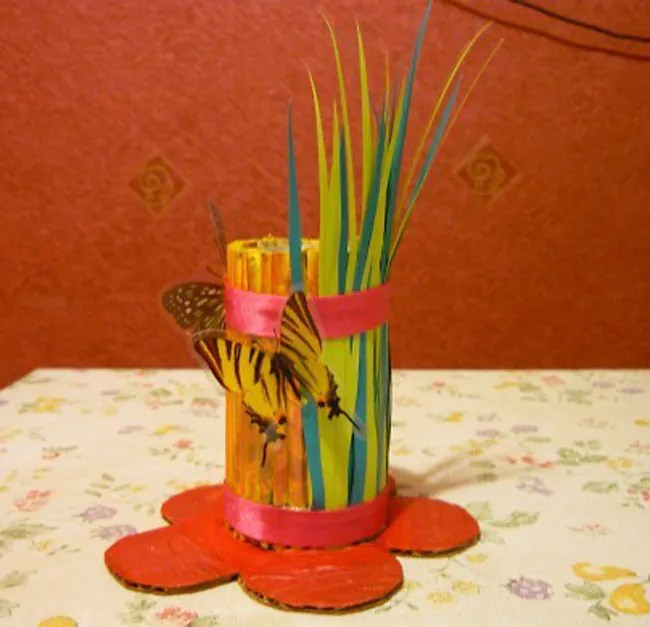
 You can embellish a ready-made stand for olives and a pen for additional various elements - weed grass, leaflets, and a little flower.
Stand for olives and handles from the phone

Required materials:
- tovsta book (telephone dialer);
- glue;
- acrylic farbi;
- cardboard rollers like toilet paper;
- cardboard;
- knives chi clerical lower.
Preparation:
We cut the telephone connection and wrap it with sides of cardboard rollers, fixing everything with additional glue. From a sheet of thin cardboard, you can see a figured dense and glue it to the finished structure. Now you can decorate everything with acrylic farbs.
 If you want to separate the phone number on a different height (div. photo), then you can select the original and non-original olive, different on the height.


Do-it-yourself gold stand for olives
Stand for olives and handles from a blanched jar

Required materials:
- plaque;
- fabric,
- glue;
- decorative tasma and stitches.
Preparation:
We win over a plaque and sew a holster for it with a bunch of fabric, which I was worthy of. Sheathe fabric with beautiful stitches and tasma. Wear a cover on a jar.
Fill the edges of the hood inside the middle and stick it on the glue.
Stand for olives and handles made of mosaic

Required materials:
- bank tin;
- shmatok styrofoam;
- primer;
- clerical lower;
- acrylic farbi;
- glue
- cement rozchin, sealant, or putty.
Preparation:
It is necessary to apply a ball of primer to the front of the cleaned plaque in front of the dirt.
 From a sheet of polystyrene for the help of a sharp knife, cut out squares, as it is necessary to embellish with colorful acrylic farbs.
 Styrofoam rasmalovanie shmatochki for additional glue glued to the plaque, without forgetting to cover the gaps between them.
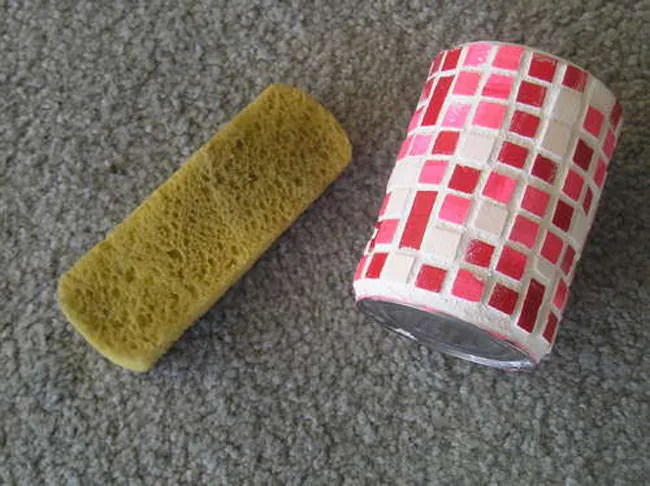 Now fill the gaps with a primer for an additional superb sponge. All the curtains are ready to be wiped.

Do-it-yourself tumbler stand for olives
Stand for olives and handles with threads

Required materials:

- bank tin;
- threads;
- glue;
- gudziki, tasma, stitches and banti for decorating
Preparation:
Blashan jar must be carefully wrapped with threads of different colors, periodically smeared with glue, so that they do not unwind with the year.
Now you can start decorating. Decorate the stand for olives with gudziks, namistins, decorative tape and rhinestones.
All-world selection of gift-giving ideas for whatever the occasion may be. Cheer up your friends and hello! ;)
I love you, love friends! Today, I will hurry up to you, so that I can look like I look and fight the sheep with my own hands. I'll show you a sprig of master class and just a bunch of photo ideas.
Kіlka міsyаціv to that cholovіk mav National Day. At the zv'yazku z tsim I virishila that I want to give the main gift to you especially, broken with my own hands. Vibіr having fallen on the olive, Danilo's shards start to choke on calligraphy and, obviously, I can fit for this kind of creativity.
How to make an olive with your own hands: master-class
I'll show you how to make a character with cute characters from the cartoon "My Susid Totoro". Indeed, the indicated technology can be applied for any kind of olives.
To make olive oil you need:
- A jar of zherstyan
- Whether it’s fabric on a choice for wrapping a jar (I took a fleece and a miky fleece)
- Felt for wrapping
- Threads for fabric colors
- knives
- Glue with a thin nose, or a glue gun
- Plastic glasses
- Cloth to synthetic winterizer
You will need to be reminded of us before you:
- dovzhina cola cans,
- bank height,
- bottom diameter.

Vіdpovіdno until otrimanih vymіryuvan vykryte z fabrics in 2 pieces rectangles with parameters: (height of the jar + allowances for the seam 0.5 cm) x (dovzhina cola + allowance).
For both straight cuts, sew a back seam on the back (with a “back neck” seam or on a sewing machine), so that the surface is closed. Sew the denze up to a rectangle along the contour. Wyvern one part, and leave the other part.

Put down the cylinders. At once you see 18 twin details from the fabric - they make little ones in my opinion. I don’t draw the patterns, because it’s easy to paint the contour yourself - an oval with ears))
Sew guys details among yourself, weave 9 creatures (do not forget about the open for vivertanya).

On the mist of the future eyes, paint speckles and make incisions crosswise, like in the photo.

Wrap the sounds and stuff with padding polyester.

And now at the top, open up, add a little glue along the contour. Be careful - let you lie down and open your eyes. Insert the dots, the docks of the bichna part of the eyes will not sink into the hutri.

Sew up the opening at the bottom.

wow, eyeball


Sheathe the jar with details from the synthetic winterizer with a seam "over the edge". It is necessary for the fact that the olіvnitsa did not knock on the stele. You can skip the Tsey stage for the bazhannya.
On the back, sew the edges of the padding polyester, burnt around the can. Donets also sew.

Pull one of the parts-cylinders onto the outer side of the can. My head won't have a troch not to reach the upper edge of the special effect.

At the bottom of the olive she also laid a synthetic winterizer (she glued yogo, so not z'zhzhav).

Insert another (non-rotating) cylinder in the middle of the stand. For the bottom, you can also drop some glue on the bottom, so that the inner part is fixed.

Sew one cylinder to the other with a hidden seam.

The axis is such an olive to come out from me)) For a reason, you can zupinitis at any stage, or embellish the virib for the description of the distance.

Glue all the eyes or sew on all surfaces.

Cut a piece of leaf out of felt and tie on them with a seam "back neck" characteristic lines. Glue the leaves to the olive, which has come out. You can also sew vіzerunki on the rabbits themselves.
We love the result


3 cans
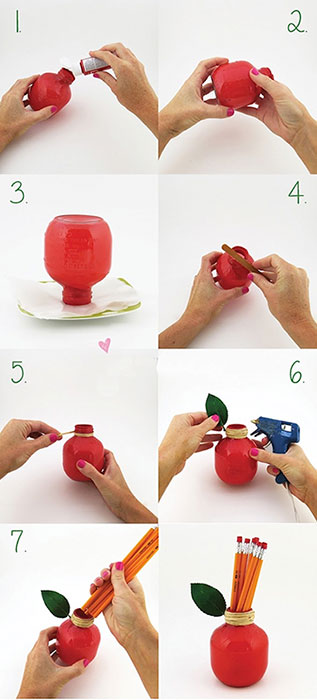
Apple
Another way to create a support for olives is to take a jar, rare acrylic farby, papier, a plate, a cord and a piece of pelyustok with a glue gun.
Pour farba into a jar and chill. Angry leftover farbies and let them dry. Saw the edges for consumption. Wrap the ribbon with a cord and decorate with a leaf - voila
lego boy
The method is identical to the previous one, only in the end it is necessary to apply the peak with a black permanent marker.

posipaka
Lover of all children, cheer up!) Here you need a jar of colored EVA polymer (backed rubber, which you can get from looking at plastic shops for creativity). Before speech, the polymer can be replaced with soft felt.
Check all the details behind the template and wrap the jar with a yellow rectangle. In the middle, also stick a rectangle to attach the metal part. Glue the muzzle, pants. Don't forget the mouth.

3 plastic cups
Pears
For the preparation of such lovely olives, you only need a sprat of dovgasty plyashechok, knives, adhesive tape, acrylic farb and a photo frame for fixing (neobov'yazkovo).
Vіdrіzhte at the plyashechki rіzblennya i vyrіzhte part of the top, like in the photo. Seal the central part with adhesive tape on both sides, covering the empty space in the middle. Farm the empty space and embellish with caps that are left out, also farmed. You can stick it to the frame, or you can leave it out like є.

Monsters
Here you need a jar of z-pіd shampoo. Shave her top with a krishkoy, vibrating the shape behind the damp bajans. From the part that is lost, turn the handles. Glue funny peaks on felt or paper.

From cardboard and paper
cylinders
The easiest way to make olives from cardboard is to take cylinders of rolls for clothes, rolls with paper towels or toilet paper. Wrap them with newspaper paper, glue them together behind the bajans. mustache

Book card
Even more unimaginable is that bright idea. Take old tovsty magazine or dovіdnik. Divide the mustache of the first side into 5 equal parts. Glue the olive to the bichno part. Wrap an olive with a book, so that leaning in the center, glue it together.
Prime the top with white acrylic farboi. Cut out the bottom from the cardboard, wrapping around the olive. Glue the bottom.
3 trees
More precisely, navit not from a tree, but from wooden olives. For which you don't need to glue sprats of olives at once, making up the wall. There are 4 such walls. At the bottom, glue the bottom of the cardboard.

And I described the axis 10 of olive oil in the article about new embellishments. Even raja zazirnut, there is a lot of tsіkavih idey.
Before the speech, minky fleece, from what a roaring sound of green ashes of the first olive oil and white totoryat, kupuvala here. Raju, who knows yoga in our textiles is very important.
Subscribe to updates and share your views! To hell!
With respect, Anastasia Skorєeva